March 25, 2017


Adjusting Drapery Yardage Requirements for Pattern Repeat 


In a previous blog from last May I described in detail the “how to” of calculating yardage for draperies and in that blog I promised to explain how one adjusts for a fabric pattern repeat that will require matching. The basic formula is simple, and I will talk about that first for persons who want to get to the point of it and move on.
A Matched Pattern Allows the Treatment to
Look Uniform all the way Across
 

To adjust drapery yardage calculations for matching the pattern horizontally across a drapery panel or treatment: (Going back to the previous blog, this would be step 2B) After performing the necessary “ADD TO LENGTH” calculation for your particular treatment, the adjustment for pattern repeat is made.

FIRST, find the VERTICAL repeat of the pattern. This is a curious but critical phenomenon to remember, but when calculating a Horizontal pattern match, the Vertical repeat of the pattern is the dimension that is required. The vertical repeat of the pattern (if you don’t have yardage in hand) can be found listed on the supplier’s or manufacturer’s label which is usually attached to the back of the fabric sample.
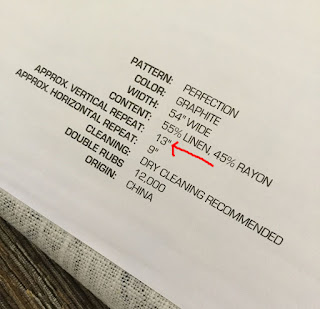
Example of a Manufacturer's Tag


Notice the vertical repeat is stated as “approximate”, this is because the repeat of the pattern may not always be exactly the same from manufacturer run to run, so keep this in mind when placing the final order for fabric as a little extra may be required for a perfect pattern match.

SECOND, once the vertical repeat of the fabric pattern is determined, take the adjusted “add to length” dimension and divide it by the vertical repeat. In the example in the previous blog this was 118 inches, and since in my example above the approximate vertical repeat is 13 inches, we will use that for this example. So, 118 divided by 13 = 9.076923.

THIRD, round UP to the next whole number, 9.076923 rounded up, is 10. This means you will need 10 vertical repeats of the pattern in order to match it across the widths when they are sewn together.

FOURTH, multiply the result times the vertical repeat. 10 X 13 = 130 inches. So, instead of 118 inch cuts or lengths of fabric, we will need 130 inch cuts. A difference of 12 inches per cut!

LASTLY, to complete the total yardage calculation, return to the previous blog step 5 where the total yardage is calculated, and substitute the repeat adjusted cut length number. In the example 4 cuts X 130 = 520 divided by 36, equals 14.44 yards. This is the new yardage requirement for the drape in the example using a fabric with a 13” repeat.

The difference in yardage to match the pattern across the width of the drape in the example is 1.19 additional yards, and because the vertical repeat as stated by the manufacturer was “approximate” it is advisable to also round UP the total yardage before ordering to the next whole yard. In the example, I would order 15 yards to be safe.

Later, why do you want to pattern match? What is the use for all that other valuable information on the fabric manufacturer’s label?
 

May 23, 2016

How to Calculate Yardage for Custom Draperies


A Beautiful Pair of Custom Made Draperies
I have been reading a lot of posts lately about just how this is supposed to be done and since I am finding a lot of inaccurate information out there, the thinking with this post is to make it easy to correct. 

The formula below is for calculating yardage for custom quality draperies in 5 easy steps.  In this post, the assumption is being made that the fabric does NOT have a pattern repeat. (I will explain how to adjust for repeating patterns in a future post) Because quality custom drapes will always be pattern matched if the fabric chosen will allow it.

STEP 1:  MEASURE- Take measurements and determine the width and length of your completed drapery .(How to properly measure for draperies has been very well covered on web sites throughout the internet, but if I get any requests to cover the subject in greater detail, I will be happy to add a blog on that subject later as well.) For the purpose of this example, I am going to pretend that the finished drapery will cover 72" of the rod width, or it will be 72" wide, and the length will be 100". Your measures may be different, but they can be substituted for my 72 and 100 in the example. Once the measurements for your completed drapery have been determined, proceed on to the next step.

STEP 2: ADD TO LENGTH-  Now, for the custom quality effects, we need to add to the length of our measurements. To the length, add 18". This allowance is for a 4" double hem at the bottom, and a double 4" turn around the buckram stiffener at the top, the other 2 inches are a working allowance for straightening the fabric as the drapes are made and/or for any material which may unravel while working on the drapes. This allowance is what is known in the profession as the "working allowance". Any custom treatment will have some sort of "add to length" working allowance which is required to properly construct the product and retain quality. Sometimes a drapery can be made with less than an 18" working allowance, but somewhere in the process, the quality will suffer, it might be done in such a way that it is not very noticeable, but common custom drapery making practice dictates the addition of 18". So now for our example, we will need 118" long cuts, pieces, or lengths of fabric to make our drapery. 100+18=118.

STEP 3: ADD TO WIDTH- To the width of the finished drapery we need to add for three things, the first is the "returns" of the drapery panels. The return is the part of the panel that covers the projection of the rod between the front of the drape and the wall. Drapery returns give the drapes a third dimension and without them there can be a bad looking gap that allows light to leak past the drape between the wall and the finished panel. If a return is not added it can also allow the lining material to show when viewed from the side, as seen in the example below. To alleviate these problems, custom draperies have a "return" which is
Draperies Without a Return
typically 3-1/2 to 4 inches.
The other add to width consideration is the overlap addition. If the drapes will be a PAIR, they will typically overlap in the center where the two halves of the pair meet. This can be very little, 1-1/2 to 2 inches on a hand drawn drapery to about 4" on a typical utility type traverse rod. If the drapery you are making is a panel, (1 single drape drawing in 1 direction only) you do not need to concern yourself with the overlap. This addition applies to PAIRS only. So, if you are making a PANEL add 1 return dimension to the width, if it is a PAIR add two returns (1 for each panel of the pair), and add 1 overlap. So for the example which I am making a PAIR, the add to width looks like this: 72 + 4" overlap + 8" (2 returns)= 84"  
The 3rd add to width consideration is a thing we call "ease" or "relax". This would be added to drapes which may spring back when drawn closed. This is of particular concern for drapes that will be hanging 
Overlap Master on a Utility Type Traverse Rod

on hand drawn rods with rings or on utility traverse rods where the fabric is particularly bulky or stiff. The amount of "ease" needed is not an exact science and an educated guess regarding your type of rod, type of pleat, and type of fabric will determine the amount of "ease" that should be added. If not enough is added, the drape may not overlap as it should and the fabric may gap open in the center, If too much is added, the drapery will have extra fabric between the pleats 
when fully closed. It is best to remember that a little too much ease is better than not enough as the gap is much more noticeable than a little too much fabric between the pleats. In my example, I am assuming that a nice medium weight fabric is being use on a utility type traverse rod, so I am only adding 2" (about the minimum) of ease to my width. So now the FINISHED drapery WIDTH will be 72+4+8+2=86.

STEP 4: CALCULATE NUMBER OF WIDTHS NEEDED- Now we know we will want our drape pair to finish at 86". To calculate the number of widths,cuts, or fabric lengths we need to make our drapery, we must first add "fullness" to the finished width. Fullness is the extra fabric that will be taken up in the pleats when the drape is made. The more "fullness" a drapery has in it, the more luxuriously it will hang. This is critical to the custom appearance of the drapery. Not enough fullness will result in a drape that flattens out at the bottom and flares. Typical French pleated draperies require at least 250% fullness. Other pleat styles may require more or less fullness, but keep in mind, that less than 250% is often problematic if a full and luxurious drape of the fabric is desired. In my example, I am calculating the typical 250% addition for "fullness", so now the calculation looks like this 86 X 2.5=215" or 86 X 250%=215".To determine the number of fabric cuts you will need for this drapery, divide 215 by the width of the fabric being used (in my case 54") 215 divided by 54=3.98 widths (always round UP to the next full width). So I need 4 widths, or cuts of fabric for my drapery.

STEP 5: CALCULATE YARDAGE NEEDED- Going back to step 2, we know we need 118" long cuts, and from step 4 we know we need 4 of them. To calculate the yardage required we multiply 118 X 4 = 472" of fabric needed. Divide this by 36 (number of inches in a yard) so for this drapery pair 472 divided by 36 = 13.11 yards needed (round up to the nearest 1/4 yard just in case you need to work around a flaw), so 13.25 yards are needed to make a drape for this example window. 

CONCLUSION: This really is a lot easier than it might sound. Practice these steps on your own windows and come back later if you choose to use a fabric with a pattern in it. I will talk more about calculating yardage for those and also maybe the mechanics of cutting and sewing the cuts together. Hope you will return for a future lesson.

April 27, 2009

Draperies Have Always Been GREEN

Choosing environmentally friendly home furnishings is the thing to do today if one wants to do what is wise for the future of our children and our planet. While the manufacturers of many home décor products are rushing to change or re-package their products to be in harmony with the new “green” trend, there is one ageless and timeless product in the home furnishing category which can proudly make the claim to having always been green. Draperies, a simple idea invented centuries ago which has fundamentally changed very little over time and they are as environmentally friendly today as ever.

When open draperies allow sunlight to enter the room. The free energy provided by the sun will warm a room nicely on a cold day, and can significantly reduce heating costs and energy usage. In addition to being environmentally friendly this functionality allows for the preservation of the view through the window which is framed nicely by the soft folds of the fabric hanging to the side of the glass.


An Elegant Bedroom Drapery Treatment

When closed draperies can block the sunlight to reduce summer cooling costs and air conditioning energy usage. Closing draperies at night in winter also help to keep your heat from being lost through the glass. Even with today’s energy efficient windows, the extra layer of fabric between the window glass and your room, plus the air space layer created between the drape and the glass insulate against heat and energy lost. The bonus to all the energy saving is the privacy the drapes provide at night while still being a pleasant decorative addition to your room.

The Same Window Shown with Draperies Closed